
How to Use CapCut for Free: A Complete 2026 Guide
now
147.8 MB
v19.1.0
50M
Description
If you’ve scrolled through TikTok, Instagram Reels, or YouTube Shorts recently, you’ve probably noticed how polished even everyday creators’ videos look — smooth cuts, perfectly timed captions, transitions that hit right on the beat. A huge part of that trend comes down to one app: CapCut. And here’s the part that surprises a lot of new users: you don’t need to spend a single rupee, dollar, or dirham to get most of it done. Learning how to use CapCut for free is genuinely enough to produce content that looks like it took a professional editor and a paid subscription to make.
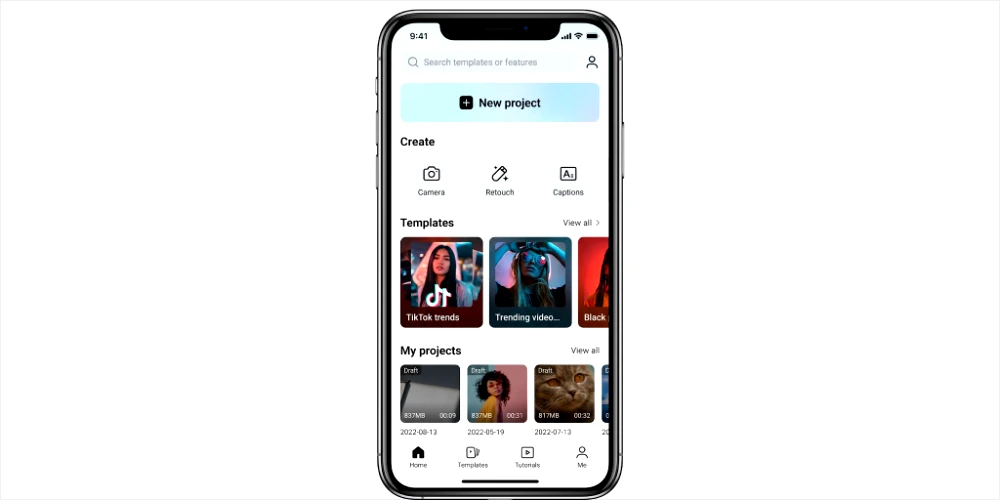
CapCut, developed by ByteDance (the same company behind TikTok), launched in 2020 and has since grown into a full editing suite available on iOS, Android, Windows, Mac, and directly in your browser. Because it’s built with short-form platforms in mind, it’s become the default choice for creators who want strong results without wrestling with a steep learning curve or complicated software.
What makes CapCut stand out isn’t just that it’s free — plenty of apps claim that and then hide the useful tools behind a paywall. CapCut genuinely lets you edit full videos, add auto-generated captions, apply trending templates, and export in 1080p without ever entering payment details. There are limits, of course, and understanding them upfront will save you from surprises mid-project.
This guide breaks down exactly how to get started with CapCut for free — from setting up your account, to using the editing tools that matter most, to exporting a finished video ready for TikTok, Instagram, or YouTube. Whether you’re a student, a small business owner, or just someone experimenting with content for the first time, everything covered here costs nothing to follow.
Table of Contents
What Is CapCut, Exactly?
CapCut is a video editing app developed by ByteDance, the company behind TikTok. It launched in 2020 and has since grown into a full editing suite available on iOS, Android, Windows, Mac, and directly in your browser. Because it shares an ecosystem with TikTok, it’s become the default choice for short-form content creators who want professional results without a steep learning curve.
The core appeal is simple: it’s genuinely capable, and a large part of it costs nothing.
Key features of CapCut
Trimming & cutting — frame-precise clip editing on a simple timeline
Auto-captions — automatically transcribes your voiceover into on-screen text (capped at ~10 min/video on the free plan).
Templates — trending, beat-synced templates you can drop your own clips into for a fast, polished result
Transitions & effects — a large built-in library for scene changes and visual style
Speed ramping — slow-motion or fast-forward control over clips
Filters & color adjustment — for a consistent look across a video
Royalty-free audio library — music and sound effects safe for monetized content
Background removal — green-screen-style cutout without a physical green screen (limited uses/month on free plan)
Cross-platform sync — mobile, desktop, and browser versions share the same project library via your account
One-tap export & share — direct export to TikTok, Instagram, or YouTube, up to 1080p on the free tier
An advanced AI robot wearing headphones and sitting at a futuristic desk, using its robotic hands and holographic interfaces to edit video projects in a sophisticated studio. This image illustrates how anyone can edit videos efficiently and create professional content, similar to the powerful tools offered by CapCut for free.

Is CapCut Actually Free?
Yes — and this is worth clearing up because a lot of apps advertise “free” and then bury the useful features behind a paywall. CapCut isn’t like that. You can download it, create an account, edit full videos, add captions, and export at 1080p without ever entering payment details.
That said, “free” does come with a few sensible limits. Understanding them upfront will save you from surprises halfway through a project:
- 1080p export cap — you won’t be able to export in 4K on the free plan.
- AI auto-edits — limited to a set number per month (currently around 5).
- Background removal — also capped at roughly 5 uses per month.
- Auto-captions — free users typically get about 10 minutes of auto-generated captions per video.
- Watermarked templates — some premium-tagged templates add a permanent watermark unless you upgrade.
For most casual creators, students, small business owners, and anyone making occasional social content, these limits rarely get in the way. You’ll only bump into them if you’re editing daily or need cinema-grade export quality.
Step 1: Download and Set Up the App
Getting started costs nothing and takes a few minutes.
- Go to the App Store, Google Play, or capcut.com and install the app for your device.
- Open the app and create a free account using your email, Google, or Apple ID.
- Once signed in, your projects sync automatically across devices — so you can start editing on your phone and finish on desktop without losing progress.
There’s no trial period to worry about and no credit card requested during sign-up, which is part of why so many beginners default to CapCut instead of paid alternatives.
Step 2: Import Your Footage
Tap “New Project,” then pull in clips from your camera roll, cloud storage, or CapCut’s built-in stock library. If you’re recording specifically for a short-form platform, shoot vertically (9:16) to avoid awkward cropping later.
Step 3: Use the Free Editing Tools
This is where CapCut genuinely earns its reputation. The free toolkit includes:
- Trimming and cutting clips with frame-level precision
- Text and captions, including the popular auto-caption feature that transcribes your voiceover automatically
- Transitions and effects, with a large library available at no cost
- Speed ramping for slow-motion or fast-forward moments
- Filters and color adjustments to match a consistent aesthetic
- Royalty-free music and sound effects from the built-in audio library
A practical tip: if you extract music from someone else’s video rather than pulling from CapCut’s licensed library, that track is generally fine for personal use but not safe for monetized content. Stick to the built-in commercial library if you plan to earn from the video.
Step 4: Use Templates to Speed Things Up
If editing from scratch feels overwhelming, CapCut’s template library is arguably its best free feature. You pick a trending template, drop your own clips into the placeholders, and the app automatically syncs cuts and transitions to the beat of the music. It’s a fast way to produce something polished even if you’ve never edited a video before.
Just double-check the template isn’t marked “Pro” — those add a watermark unless you’re subscribed.
Step 5: Export Without Paying
When you’re happy with the result:
- Tap Export in the top corner.
- Choose your resolution — free users can go up to 1080p, which is genuinely sufficient for nearly all social platforms.
- Pick a frame rate (30fps is the standard choice for most short-form content).
- Tap Export again, and the finished file saves to your device with one-tap sharing to TikTok, Instagram, or YouTube.
A quick note on quality: exporting at higher resolutions than 1080p mostly just increases file size without a visible difference on platforms like TikTok or Reels, so the free tier’s cap rarely holds creators back in practice.
Getting the Most Out of Free CapCut
A few habits will help you stretch the free plan further:
- Batch your AI features. Since background removal and auto-edits are capped monthly, plan rather than experimenting freely mid-project.
- Avoid Pro-tagged templates if you want to skip the watermark entirely — there are plenty of non-Pro templates that still look great.
- Use manual captioning for longer videos. If you go over the free auto-caption limit, you can still add text manually at no cost — it just takes more time.
- Reuse project files. CapCut lets you duplicate and tweak past projects, which saves time if you’re producing similar content regularly.
Is CapCut Pro Worth Paying For?
Not right away, and maybe not at all depending on what you make. Pro unlocks 4K export, unlimited AI edits, advanced motion tracking, and vocal isolation — genuinely useful for professionals producing high volumes of content or working with agencies. But if you’re a casual creator, a student, or just starting, everything you need to publish consistently good videos is already sitting in the free version.
Does CapCut have a hidden trial period?
No. The free plan is permanent, not a limited-time trial. You can use it indefinitely without ever being asked to pay.
Will my exported videos have a watermark?
Only if you use a Pro-marked template. Standard exports and most templates are watermark-free.
Can I use CapCut for free on both mobile and desktop?
Yes. The free tier applies across iOS, Android, Windows, Mac, and the browser version, and your projects sync between them.
Is CapCut safe to use for commercial or monetized content?
Generally yes, as long as you use music and effects from CapCut’s licensed library rather than audio extracted from third-party videos.
Is it really possible to use CapCut for free forever?
Yes. CapCut’s free plan has no expiration date or trial period — you can use CapCut for free indefinitely, without ever being prompted to enter payment details.
What do you lose by using CapCut for free instead of upgrading?
Mainly resolution and volume limits: 4K export, unlimited AI edits, and advanced tools like motion tracking aren’t included. For everyday short-form content, using CapCut for free covers nearly everything most creators need.
Can I remove watermarks while using CapCut for free?
Standard exports and most templates are watermark-free by default. Watermarks only appear if you use a template specifically tagged “Pro” while on the free plan.
Do I need to create an account to use CapCut for free?
Yes, a free account is required to save projects and sync across devices, but signup takes a couple of minutes and doesn’t require a credit card.
Is CapCut for free safe to use for business or brand content?
Yes, as long as you stick to CapCut’s built-in commercial music and effects library rather than audio extracted from other videos, which is restricted to personal use.
How many videos can I edit using CapCut for free each month?
There’s no cap on the number of videos or exports themselves — the limits apply specifically to AI features like background removal and auto-edits, not overall usage.
Does using CapCut for free affect video quality?
Not noticeably for social platforms. The free plan caps exports at 1080p, which is the standard resolution TikTok, Reels, and Shorts are optimized for anyway.
Final Thoughts
So, is it worth learning how to use CapCut for free instead of jumping straight to a paid plan? For almost everyone starting out, yes — without question. Using CapCut for free gives you trimming, auto-captions, trending templates, transitions, and 1080p exports, which covers the entire workflow most creators actually need for TikTok, Instagram Reels, or YouTube Shorts. The limits that come with the free tier — capped AI edits, capped background removals, and a 1080p ceiling — rarely get in the way unless you’re editing daily at a professional volume or need cinema-grade 4K output.
The smartest approach is to start with CapCut for free, get comfortable with the tools, and only consider upgrading once you’ve genuinely hit a wall the free plan can’t solve. Most students, small business owners, and casual creators never reach that point. Choosing to use CapCut for free isn’t a compromise or a “lesser” version of the app — it’s simply the sensible starting point, and for a large share of users, it’s also the permanent one.